05
2018Web Sharpener Script – Better Sharpening for the Web
Introduction
For many of us the internet has become the main portal for the presentation of our images. Unfortunately the necessary downsizing results in a loss of details and clarity of the original. To preserve some of these details an efficient workflow is required, that surpasses the default algorithms used in Photoshop.
Over the years I’ve looked for better methods and created a more and more refined process for downsizing my images. First I used Photoshop actions to accomplish the task but I wanted more flexibility and so I wrote a script to make this possible. Now my web images look more detailed and closer to what I’ve got in the original shot.
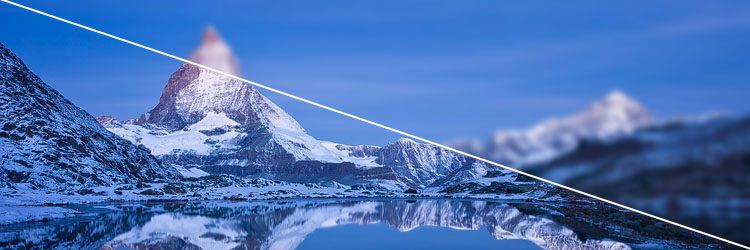
It’s nice to talk about things but seeing the result is even better. Look at this comparison between the downsizing done by Photoshop (on the left) and the version I created by using my script (on the right). You can move the slider in the middle of the image to switch between the versions.
Photoshop (left) – Web Sharpener Script (right)

Requirements
Photoshop CS4 or higher (Windows or MacOS)
Description
After you’ve copied the files to the right folder (instructions at the end the page) the two variants of the script can be found under „File->Scripts“. To use the single image variant (Web Sharpener V1.0d), at least one image has to be opnened for the dialog to show up. The batch variant to process a folder of images (Web Sharpener V1.0d Batch) can be openend anytime.
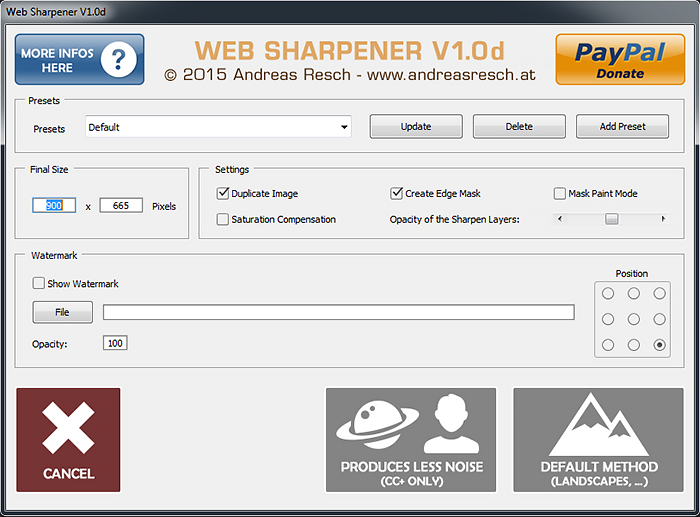 The user interface of the Web Sharpener (Single File Variant)
Presets
The section „Presets“ enables you to save presets for a later use and quick selection. The downloaded version includes one preset labeled „Default“ which can be selected from the dropdown menu. It’s set to values that work well for me, but you can update it, if you want to. To do so, adjust the settings to your liking and click the button „Update“.
Pressing the button „Update“ updates the currently selected preset with the settings of the dialog and writes the changes to the preset file.
If you want to remove the selected preset, press the button „Delete“ and confirm the dialog that pops up. After doing that, the next possible preset is selected and the settings are updated accordingly.
To create a new preset based on the current settings, click the button „Add Preset“. The new preset is then added to the bottom of the preset list.
Both the single file variant and the batch variant share the same settings file. Updating or adding presets in one of them will automatically be visible in the other variant as well.
As the file structure of the settings file has changed from previous version, you cannot migrate older settings to the new version of the script. So do not copy an older version of the settings file over the one included in the ZIP-file.
Final Size
Here you can define the size of the image you want to create. If you change one of the both values, the other one is updated accordingly to preserve the proportions of the image. When you add or update a preset, only the higher of the two values is saved. This ensures that the script can be used on images with different aspect ratios.
Settings
If you want to keep the original image unharmed, activate the checkbox „Duplicate Image“. This creates a copy of the original image before the script starts with the downscaling. This setting is ignored in the batch variant as the files are copied there anyway.
Sharpening can lead to annoying halos around edges. To prevent this from happening, the script tries to detect these edges and exclude them from sharpening by using masks. To involve this action you need to activate the checkbox „Create Edge Mask“. You can toggle the mask off an on once the downscaling is completed by shift-clicking on the mask.
By default the strength of sharpening can be asjusted by changing the layer transparency of the sharpened layers. As an alternative you can use masks to control the strength of sharpening. To do so, check the box labeled „Mask Paint Mode“. That makes sense if you want paint inside the mask to locally adjust the areas and levels of sharpening.
In some cases you might experience a loss of saturation in the downsized version, especially when the image shows a lot of details. The option „Saturation Compensation“ can help to bring some of the lost saturation back. It creates a seperate saturation layer which can be regulated by adjusting its layer opacity. In addition you can modify the mask next to the layer.
The slider Opacity of the Sharpen Layers“ adjust the transparency of the sharpened layers. The default values are 40% for the basic layers and 20% for the detail layers.
Watermark
If needed, you can add a watermark or signature to the final image by ticking the checkbox „Show Watermark“.
The watermark file must be readable by Photoshop and should only contain one layer. If you want parts of the watermark to be transparent use a PSD-, TIFF- or PNG-file. To select the watermark file, click the button „File“ and choose the file in the file dialog.
The watermark is loaded into a separate layer whose transparency can be set under „Opacity“. Whether it is placed in one of the corners or the center of the image can be defined in the grid below „Position“. The distance to the border of the image has to be included in the watermark file itself.
The two sharpening variants
At the bottom of the dialog you can find the two big buttons „PRODUCES LESS NOISE“ and „STANDARD METHOD“ for starting the downscaling process.
The option „PRODUCES LESS NOISE“ is only available in Photoshop CC and newer versions. Otherwise this button is deactivated. This method works well, if you want to keep the noise, which can appear because of the sharpening, at a minimum. That can be necessary if your original was shot at high ISO or if you want to keep the skin in portraits soft.
For any other case or older versions of Photoshop, chose the „STANDARD METHOD“.
The Sharpened Image
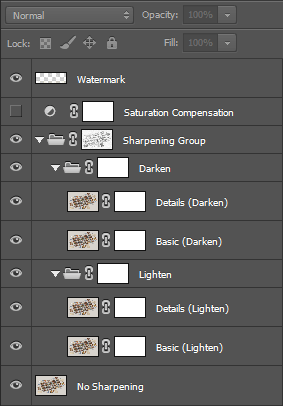
Layer structure
After the script has finished, the downsized and sharpened image contains several layers which allow further adjustments. Their meaning is explained here.
Layer „No Sharpening“
You can find the unsharpened version of the image here.
Group „Sharpening Group“
This group of layers contains all the layers that contribute to the sharpening. If you had the option „Create Edge Mask“ checked, you will find a mask along with the group that reduces the sharpening of contrasty edges. If needed you can further refine the mask or switch it off and on by shift-clicking on it.
Group „Darken“
This group is responsible for the sharpening of the dark areas of the image. This can be examined best with branches or grass in front of a brighter background. If the result appears to be too strong, you could lower the opacity of the group.
Group „Lighten“
This one is similar to the „Darken“ group, except that it takes care of the lighter details in the image. A good example for this are blond hair in front of a dark studio background or snow-covered branches in front of a blue sky. Again the effect can be adjusted by changing the group opacity.
The „Basic“ layers
In either of the groups „Darken“ and „Lighten“ you will find a layer named „Basic“. This layer contains the main sharpening effect which affects the bolder details of the image. You can adjust the effect by changing the layer opacity. In case you had the „Mask Paint Mode“ option checked, the transparency of the layer is controlled by the brightness of the mask. You can further refine the strength of sharpening by painting directly inside mask. Painting in black lowers the effect, painting in white creates a stronger sharpening in that area.
The „Details“ layers
Unlike the „Basic“ layers, the „Details“ layers control the sharepening of the finer details. This will enhance textures like rocks, distant forests and so on. If you go too far here you might increase noise and moiré – so be careful.
Saturation Compensation
As mentioned before this layer restores some of the lost saturation. In case the „Saturation Compensation“ checkbox was not activtated, the layer still exists, but is invisible. The strength of the layer can be adjusted by the layer opacity.
Watermark
This one is created if you had the option „Show Watermark“ checked in the script dialog.
Saving the image
Compared to previous versions of the script, the image is in sRGB color mode and has a color depth of 8 bit. You can save the image as JPG straight away now.
The Batch variant of the script
By popular request it’s finally possible to sharpen a whole folder in one go. To do so, choose the entry „Web Sharpener V1.0d Batch“ from the menu „Files->Scripts“. The upper half of the dialog is the same as in the single image variant, which has been explained above. The lower part contains a few specifiv setting which I will explain here.
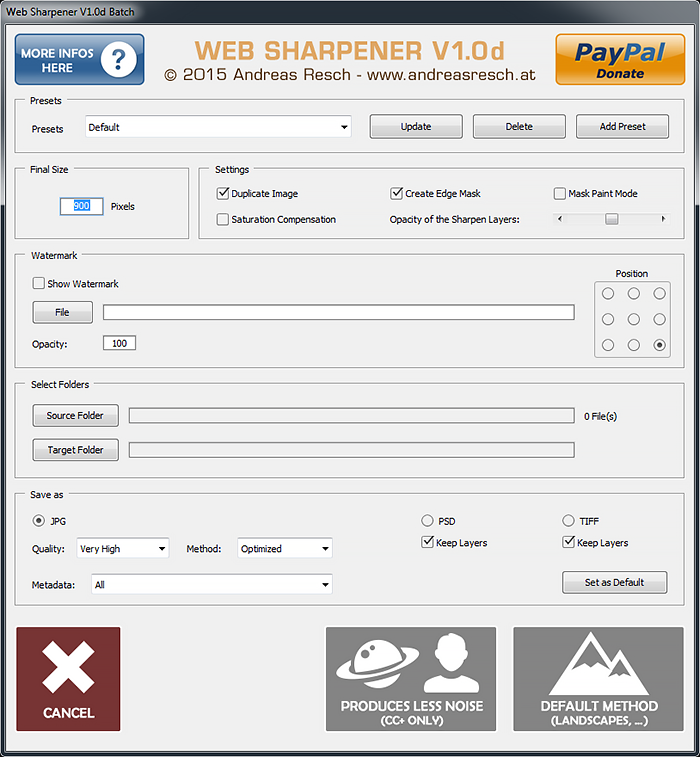 The user interface of the Web Sharpener (Batch Variant)
Select Folders
To choose the folder containing the source images, just click on the button labeled „Source Folder“. Select the required folder and confirm your choice by clicking „OK“. If that folder contains any usable files, their amount is shown right behind the text field of the source folder. For now the script will open the following file formats – JPG, TIFF, PSD, DNG, CR2, NEF and ARW.
The place, that the finished files will be saved in, can be selected by pressing the button „Target Folder“. In case, that folder doesn’t exist yet, you can create one by clicking on „Make New Folder“ inside the selection dialog.
Save as
The downsized image can be saved as either JPG, PSD or TIFF file. Depending on your choice there are a few options available.
Save as JPG
Under „Quality“ you can choose the level of compression. „Very High“ should be appropriate for most cases and will result in a very detailed image. With „Method“ you can decide between the two loading algorithms of JPG files. „Optimized“ will load the image line by line in full quality, whereas „Progressive“ will load the image at full size but lower quality and increase its details while loading. By selecting one of the „Metadata“ options, you can define how much of the image information will be transfered into the JPG file.
Save as PSD
In case you want to save the result as a PSD file, choose this option. By default „Keep Layers“ is activated which will keep all the layers of the file intact. This is useful, if you want to adjust the sharpening afterwards.
Save as TIFF
Similar to the PSD option, the files can be saved as a TIFF file too. Again you can decide, if you want to save the layers within the image.
Another comparison between Photoshop (left) and Web Sharpener (right)

Download and Installation
To download the script package, click on the following button.
Inside the ZIP file you will find a folder called „Web Sharpener Installation“. It contains all you need including a file called „Readme.rtf“ which explains how to install or uninstall the script.
If you should encounter problems with the installer version above, you can try to download the manual installation version. Check the included readme file for installation instructions.
Updating from previous versions
If you’re updating from a previous version (V1.0a and above), you can preserve your presets by copying the file „WebSharpener_Settings.xml“ to the folder of the new version of the script and overwriting the one that was created by the installation.
Support
As you can imagine, the creation and support for the script takes some time. If you use and like what I did here you can support the development of the script by donating as much as you find appropriate to my Paypal account. To do this, just click on the button below.
Inna
Is any possibility to install Websharpener in ACDsee system?
Andreas Resch
Unfortunately not. The panel uses Photoshop core commands.